The following is taken from the Royal Navy's Torpedo Drill Book, 1914 (corrected to May 15), published by His Majesty's Stationary Office.
| Charge | 500 lbs gun-cotton |
| Best depth | 48 feet. |
| Destructive radius against ships | 30 feet |
| Destructive radius against other mines | 90 feet |
| Least distance of mines from each other when fired singly | 300 feet |
| Distance of mines from each other in a line of mines | 120 feet |
| Least distance between lines of mines | 300 feet |
| Buoyancy | 100 lbs |
Insulating Plugs.- Wires are led watertight into mines by means of insulating plugs.
Insulating plugs are supplied to ships ready fitted. Those for use with electro-contact mines have wires 8 feet long rove through them, one of which is marked to distinguish it from the other. Those for use with 500 lb mines have wires 3 feet long rove through them. these latter are also for fitting disconnectors where the single boxes are supplied.
Refitting an Insulating Plug.- To refit an insulating plug, proceed as follows:-
(1) Remove the gland nut, pressure plug, and old wires, and thoroughly clean every part, making sure that no grit is left in the holes.
(2) Take two insulated wires each 3 feet long (if for E. C. mines, 8 feet long) and remove the outer coverings for a distance of 11 inches from end of each wire. At a distance of 8 ½ inches from the same ends, strip the insulation from the wires for a length of ½ inch, straighten the bared wires and sweat them together with solder.
(3) Insulate the uncovered part very carefully with tape and solution to the same thickness as the insulation; then make a pudding ½ inch long ½ inch in diameter, commencing ½ inch from the soldered part and towards the short end, and continue a serving of one turn of tape to a distance of 3 inches from the pudding towards the same end.
(4) Pass the long ends of the wires through the holes in the pressure plug at the end farthest from the stud, and pull them through until the puddings touch the iron.
(5) Pass the short ends through the holes in the base of the iron cylinder, from in out, place in pressure plug and pull the ends through until the puddings rest on the iron, taking care that the wires are not crossed.
(6) Place the plug in a vice between two pieces of lead, and screw down the gland nut as tightly as possible, making sure that the gland nut is below the level of the top part of the plug.
(7) The plug is then to be tested as follows:-
To test an Insulating Plug.- To test an insulating plug, the battery, earth plates, contact key, galvanometer, and connections having first been tested:
1st. Test for non-contact.
Join the short piece of wire from the right-hand terminal of a six cell test battery to one of the outer legs of the insulating plug, and with the other touch the earth plate. See that the uncovered ends of the inner legs are not making contact, plug up one cell, and press the key, there should be no swing, plug up two cells, three cells, and so on in succession, until all the six cells are on.
2nd. For continuity.
By joining the ends of the inner legs of the insulating plug a violent swing should be obtained with one cell plugged.
3rd. For insulation.
Leave the inner legs joined up, put the earth plate in the water, and then put the insulating plug in the water, taking care to keep the ends of the legs dry and insulated in the air. Plug up one cell, and should there be no swing, plug up two cells, three cells, and so on in succession until all the six cells are on, and if there is then no swing ascertain that the continuity is correct.
After an insulating plug has to be refitted it is always advisable to test it for insulation under pressure, either in a test tank, or if no tank is available, by joining two of the adjacent legs together, and carefully insulating the junction, and to the other legs join an outrigger length which had been tested for high insulation. Then, having tested the junctions put the plug overboard or in the tank as far as the wire will allow; join up and test for high insulation as usual.
NB:- A bridge-megger should be used if available.
The insulating plug, having been tested, should then be fitted in the mouthpiece of the mine as follows:-
Place a leather washer at the bottom of the recess and insert the insulating plug, rim end downwards, reeving the inner ends of the wires through the hole in the mouthpiece, then place the gland nut over the outer ends of the wires, and screw it hard down with a spanner, taking care that the threads are well covered with red and white lead, but that the mixture is kept well clear of the wires. The insulating plug having been fitted in the mouthpiece, place a washer of paraffined leather well covered with tallow on the under side in the recess in the mouth of the mine; insert the mouthpiece and its screw collar, screwing the latter hard down by lashing the mine to a stanchion or other convenient place, and working up the spanner with two men. No red lead should be used in making this joint, as the mouthpiece has to be taken out again when fitting the mine for service.
Test for Watertightness.- On the first convenient opportunity, the mine, with mouthpiece in place, should be lowered overboard and kept at a dept of 8 or 10 fathoms for 24 hours. The mouthpiece should then be removed to see if any water has leaked into the envelope, and if not, it should be replaced, and the screw collar screwed in slacked by hand; the insulating plug should not be disturbed. The mine should be weighted to ascertain that no water has leaked into the body of it, and having thus been tested, it is ready for fitting at the shortest notice.
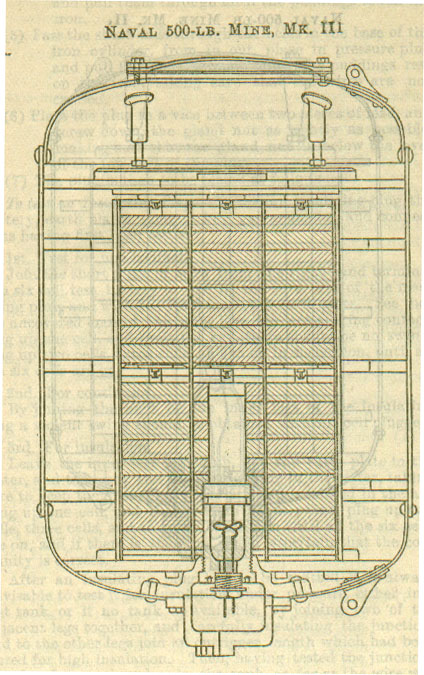
Naval 500 lb mine, Mk III.- This mine has its charge packet in 22 copper cases, stowed in two tiers, each case being fitted with a rewetting hole.
When the mine is first received from store, enter its number and gross weight, and the weights of the copper cases in Torpedo Log, and ascertain that the hole in the centre copper case is sufficiently large to take in a primer tin. Then test and insulating plug as described.
The insulating plug, having been tested, should then be fitted in the mouthpiece of the mine as follows:-
Place a leather washer at the bottom of the recess, and reeve the inner ends of the insulating plug wires through the hole of the mouthpiece, place a washer of paraffined leather well covered with tallow in the recess in the mouth of the mine; insert the mouthpiece and screw it hard down with the claw spanner. Then insert the insulating plug place the gland nut over the outer ends of the wires, and screw it hard down. No red lead should be used in making these joints, as the mouthpiece and insulating plug have to be taken out again when fitting the mine for service.
The mine will then be tested overboard as previously described.
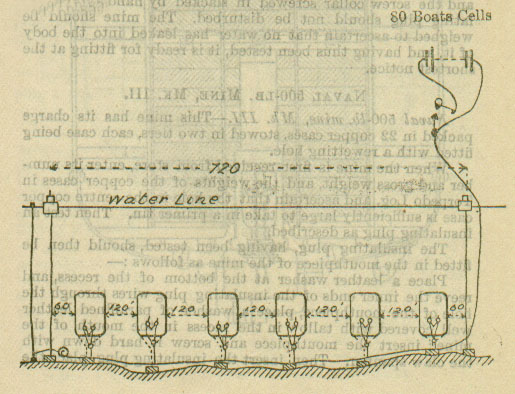
Line of Mines.- The method usually adopted in the Navy with Observation mines is to fire a line of six mines simultaneously, marking the ends of the lines by buoys, and firing as the enemy passes between them. A suitable position for a firing station which is not likely to fall into the enemy's hands must be selected, from which an observer can have a clear view of the mine field, though he should be hidden from view. These mines are fitted on the branches of half counter-mine circuits, and since the destructive effect of a 5000 lb mine may be expected to cover a radius of 30 feet, and the beam of an ironclad may be taken at 60 feet, adjacent mines may be laid 120 feet apart, and the six mines will defend a channel 720 feet wide, the extreme mines being 60-0 feet apart, and 60 feet respectively from the sides of the channel, marked by buoys.
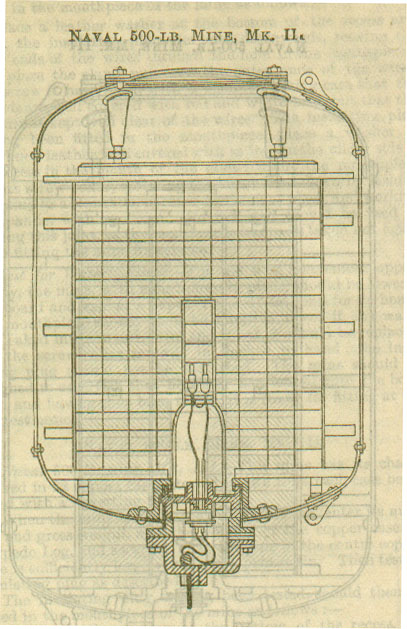
Fitting a 500 lb Mine, Mk II.- The mines being place bottom upwards in some convenient place for fitting, proceed as follows:-
(1) Remove the dome and mouthpiece of mine.
(2) Test the insulating plug for non-contact, continuity, and insulation.
(3) Insulate the outer legs of the insulating plug.
(4) Remove the mouthpiece of a tested primer tin, fitted with two No. 9 detonators in series, reeve the two inner legs of the insulating plug through the keeper for securing the primer tin, and join them to the detonators with permanent junctions.
(5) Place the detonators in a place of safety, and test the junctions for continuity; then insulate with tubing the outer legs of the insulating plug.
(6) Place the priming charge, consisting of four discs of dry gun-cotton in the tested primer tin, insert the detonators and mouthpiece and screw up tight, being careful to see that the iron of the mouthpiece in no place touches the tin.
(7) Drop the primer tin into the copper envelope, and secure it in position by the keeper and fly nuts fitted to the envelope for the purpose, next put in the mouthpiece of the mine, and the screw collar, screwing the latter hard down with a spanner as previously described.
(8) See that the attachment chains are properly shackled to the mine, and screw on the dome. The upper chain is for hoisting the mine, and the lower one for securing the mooring rope. The mine is then ready for placing in the boat.
Spanners are supplied for use in fitting these mines, and are distinguished by letters. They are as follows:-
B. A spanner 6-ft long to fit over screw collar to screw up.
E. For screwing up gland nut.
H. To fit nuts in the loading hole, cover, and dome.
I. For screwing up collar in insulating plug.
L. For screwing in envelope.
And an "extricator for all mines" to withdraw the mouthpiece.
Fitting a 500 lb Mine, Mk III:-
(1) Remove the dome, insulating plug, and mouthpiece.
(2) Test the insulating plug for non-contact, continuity, and insulation.
(3) Insulate the outer legs of the insulating plug.
(4) Remove the mouthpiece of a tested primer tin, fitted with two No. 9 detonators in series, reeve the two inner legs of the insulating plug wires through the mouthpiece (taking care to see that a leather washer is in the recess of mouthpiece), and join them to the detonators with permanent junctions.
(5) Place the detonators in a place of safety, and test the junctions for continuity; then insulate with tubing the outer legs of the insulating plug.
(6) Place the priming charge, consisting of four discs of dry gun-cotton in the tested primer tin, insert the detonators and mouthpiece and screw up tight, being careful to see that the iron of the mouthpiece in no place touches the tin.
(7) Drop the primer tin into the mine, see that the leather washer in recess of mine is properly placed, put in the mouthpiece and screw it hard down with the claw hammer.
(8) Place the insulating plug in mouthpiece and screw the screw collard hard down.
(9) See that the attachment chains are properly shackled, screw on the dome, and the mine is then ready to be placed in the boat.
NOTE.- The insulating plug is on no account whatever to be placed in the recess in the mouthpiece until after the latter is screwed down, otherwise the operation of screwing down the mouthpiece will twist the wires inside the mine.
The spanners supplied for use with these mines are:-
E. For screwing up gland nut.
H. To fit nuts in the loading hole, cover, and dome.
I. For screwing up collar in insulating plug.
P. For screwing up mouthpiece.
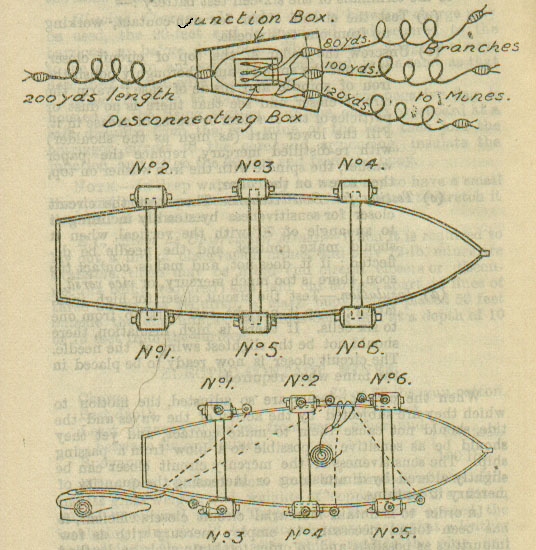
Preparations before laying out.- The launch is rigged as for counter-mining, but four thwarts are sufficient for a line of six mines.
The 90-foot end of the cable is insulated and secured to a barricoe, unless the mines are to be laid at a greater depth than 12 fathoms, in which case an outrigger circuit is to be joined to the core and armouring of the 90-foot end, the former with a permanent junction. The other ends of the outrigger length are to be insulated and secured to a barricoe.
Sinkers being placed in the boat the mines are placed in the same order as No. 1 to No. 6 mine in a counter-mine launch, and the trippers are stopped on to the cable before it is coiled into the boat, as follows:- Each tripper is stopped along the main cable, commencing at the fork of each branch, working towards the long end, enough end of the tripper being left at the fork to allow it to be attached to the sinker.
The cable is coiled into the boat thus:- The core and armouring of the long end are connected to leads from a Menotti, the cores of all branches and of the short end being insulated. The long end is then coiled down on the head sheets (the end connected to the Menotti being underneath) until the tripper is reached, the remainder of the main cable, with tripper attached, being coiled on the wash strake before No. 6 mine, until No. 6 branch is reached. The fork to this branch is brought underneath the mine and lashed to the sinker, the branch itself is passed into the boat abaft the mine. The main cable from this fork is then taken up to the fore and aft spar abaft No. 6 mine, stopped there, 4 coils of the main cable are then stopped to the spar abaft No. 6 mine; the main cable is then taken underneath the boat and coiled up before No. 5 mine until the fork is reached; the fork is lashed to the sinker, the branch passed inboard abaft the mine, and the main cable is then coiled p before No. 4 mine. This routine of coiling up the main cable is followed right through, the cable being dipped under the boat between Nos. 4 and 3 mines, and Nos. 2 and 1. The 90-foot end is coiled up in the stern of the launch. As each branch is passed into the launch, the core and armouring are touched together, so as to test each for continuity. The cable is passed through the water before going into the launch, so as to test it throughout for insulation.
The branches are coiled on the outer side of the mine, with the end on top; they are then joined up to the mines as follows, the Menotti being disconnected:- The domes are removed from the mines, and the long end of the cable temporarily insulated with tubing and given in charge of some responsible person, the branches of the armoured cable are then rove through the domes. The core of each branch is joined up to one leg of the insulating plug of the mine, the other leg being joined up to the armouring which forms the return wire, the main junctions being soldered and insulated, but not tested, as this should not be done through a loaded mine until the mine is in a place of safety. The above junctions need not be soldered unless the mines are expected to be down a considerable time.
The dome is then put on, and the mooring rope (the length of which will depend upon the depth of water) bent to the lower attachment chain.
For ascertaining the accuracy of the direction, and the position of the line of mines, small buoys are secured with buoy ropes to the first and the last mines; these, when hauled up taut over their respective mines, will enable the actual position of the mines to be ascertained, and, if necessary, the position of the shapes corrected. The mine buoys can be removed when desired.
A 5-cwt sinker is slung to the fore part of the boat, to which the inner mark buoy is attached.
A grass line, tool box complete, hand flags, test battery, spanner for junction box, and telephone gear (if available) should be taken in the boat.
A torpedo work box should contain the following gear:-
| Soldering bit | 1 |
| Resin | ½ lb |
| Solder | ½ lb |
| Piece of tin for tinning soldering bit | 1 |
| Pliers, side-cutting | 2 pairs |
| Tape, india-rubber, in 8-inch lengths | 30 pieces |
| Solution, india-rubber | 1 tube |
| Tubing, india-rubber, in 4-inch lengths | 20 pieces |
| Twine | ¼ lb |
| Binding wire, copper | 10 yards |
| Insulated wire in 3-feet lengths | 4 |
| Earth-plate fitted to a 6-feet length of wire | 2 |
Before laying out a line of mines the amount of armoured cable and battery power available must first be carefully taken into consideration, and the positions of the mine field and stations regulated accordingly.
If the lines of mines are required to be more than 2,000 yards distance from the firing stations, it is better to divide them into groups of three instead of six mines, owing to the large battery power which would be required to fire six mines simultaneously beyond that distance, and because it is not usually desirable to employ more than 80 boats' cells as the firing battery.
If the necessary multiple cable is available, the conductivity resistance of a line of mines can be much reduced by employing several cores, and this will enable a line of six mines to be fired at greater distances.
The plan of the defence should be marked off on a large scale chart or plan, to be kept in the possession of the commanding officer, and every precaution should be taken that it (or a copy of it) does not fall into the enemy's hands.
Selecting the Stations.- Depending on the supply of armoured cable and batteries, the first thing to be done is to select a firing station in some well-protected position covered by the fire of guns from ships or forts. It should have the mine field in view, and must be in the prolongations of the lines of observation mines when laid out.
Everything likely to attract observation at this station should be carefully removed.
When mines have to be laid in line, leading marks should be placed on shore in the prolongation of the lines, as it is otherwise difficult to ensure accuracy.
Having, therefore, set up leading marks, drop a mark buoy 60 feet outside the position to be occupied by the outer, or further mine from the station, this, in conjunction with the leading marks, will be a sufficiently accurate guide for the boat to lay the lines by.
This buoy must be moored with a 5-cwt sinker.
As no great accuracy is necessary in the depth at which these mines are laid, the soundings taken from the chart will be sufficiently accurate, the length of the mooring ropes being regulated in such a manner that the mines may be as nearly as possible 48 feet below the surface, but in no case must the mooring ropes be less than 12 feet in length, so as to prevent the explosion of one of the mines cutting the main cable before the others have had time to fire.
To ensure the mines being laid at the correct distance apart (120 feet), a grass line is marked with bunting at 60 feet from one end, then six more marks are placed, five at intervals of 120 feet, and the last one at 60 feet. This line should be coiled down in the fore part of the mining boat, and the 60-foot end passed into a dinghy towed astern.
Laying out.- The steamboat with the mining-boat and dinghy in tow, proceeds to a short distance beyond the outer mark buoy, then turns inwards, and keeping the leading marks in line, runs close past the mark buoy, at which the barricoe with the 90-foot end is thrown overboard, the dingy is cast off, and makes the end of the grass line fast to the mark buoy, the mooring rope of which should be well tautened up (in order that this may be done rapidly the grass line should be fitted with a hook, and the mark buoy with a strop for hooking it to); the grass line is then kept moderately taut, and the first mine dropped when 60 feet from the mark buoy, the others being dropped as soon as their respective marks come opposite them. At 60 feet from the last mine slipped, the inner mark buoy is dropped, and the end of the grass line thrown overboard. The end of the cable is then taken to the junction box boat, and the dinghy hauls in the grass line, and pulls to the junction boat.
The cable, branches, etc, of a line of observation mines can only be tested by balancing the continuity resistance, which is done from the station, after the dinghy has returned, and should be less than 20 ohms.
Then secure the cable from the mines in the multiple junction box, and join it to one of the cores of the multiple cable (as ordered); also join the armouring connections together and replace the lid of junction box. This box, with the cables, would be lowered to the bottom when all the lines of mines are joined up, its position noted by cross bearings, and the boat removed.
The line of mines is then balanced from the station.
Two small pickets in the prolongation of the lines of mines should then be fixed close to the station, and the leading marks removed.
At the firing station the core will be connected to a firing key on the test table, and the firing key through a plug plate to a battery of 80 boats' cells, the positive pole of which is connected to the armouring. When the observer sees that an enemy's ship is passing over a line of mines, that is, when she is between the buoys, he will at once press the key and fire this line.
Dummy Mark Buoys.- Numerous buoys should be dropped in advance, and all around the mine field, to mislead the enemy.
When several lines of mines are laid down, the details of laying the mines, and joining up the circuits would be the same for each line, except that only one battery of 80- cells would be necessary for the whole, each line having its own firing key.
Routine of Fitting the Mine for Exercise.- When fitting mines for exercise, it is always advisable that as far as possible the details should be carried out in the same manner as for service, while to establish confidence in the apparatus supplied, blowing charges should be actually fired under circumstances approaching as nearly as possible those of actual service. As the mines contain their charges of wet gun-cotton, great care is necessary to make sure that when used for exercise, no detonators or dry primers are inserted in them.
The following is the routine of fitting a500 lb mine for exercise. The mine being placed bottom upwards in some convenient place for fitting, proceed as follows:-
(1) Remove the mouthpiece of mine.
(2) Test the insulating plug for non-contact, continuity, and insulation.
(3) Insulate the outer legs of the insulating plug.
(4) Test two No.19 fuzes and join them in series through the mouthpiece of a primer tin, and insulate the junction.
(5) Reeve the two inner legs of the insulating plug through the keeper for securing the primer tin, and join them to the fuzes with permanent junctions.
(6) Place the fuzes in a place of safety, and test the junctions for continuity, then insulate with tubing the outer legs of insulating plugs.
(7) The officer in charge will then examine the primer tin, making sure that no detonators or gun-cotton are used, and see the mouthpiece screwed into the primer tin.
(8) Drop the primer tin into the envelope, securing it with the keeper, put in the mouthpiece of the mine and screw collar, screwing the latter hard down with a spanner as previously described.
(9) The mine will then be marked "Fitted for exercise" by the officer in charge.
Mark III mines will be fitted in the same as for service except that No. 19 fuzes will be used instead of No. 9 detonators, and the precautions given above in paragraphs 6, 7, and 9, must be carefully observed.
The mines are hoisted out, boat rigged, and mines laid in the same manner as for service.
Blowing Charges.- In order that a blowing charge may be used, the 90-feet end is insulated and secured to the barricoe, as before described. This blowing charge is always to be fitted to an outrigger circuit, and is the same as that described for use with E. M. mines.
When required to join it up, see that the negative flag is hoisted at the firing station, put the charge overboard at a safe distance from the end mine of the line, then join the outrigger circuit to the core and armouring, insulate the junction, and let go the 90-feet end from the buoy.
NOTE.- In deep water it may be necessary to have a small buoy and buoy rope attached to the charge, so as to stretch it out clear of the mine.
E. C. Mines as Observation Mines.- When it is required to lay out a line of observation mines, and only 72-lb mines are available, these may be fitted (no circuit closers or disconnectors being required) and laid out 50 feet apart, in lines of three or six, as required, a mark buoy being placed 50 feet outside the end mines; the mines being laid at a dept of 10 or 15 feet from the surface.
| Charge | 72 or 76 lbs gun-cotton |
| Best depth | 10 to 15 feet |
| Least distance of mines from each other, and between lines of mines | 120 feet |
| Buoyancy | 100 lbs |
When first received from store the number of the mine and its gross weight, and weights of copper cases, if so fitted, should be entered in the Torpedo Log, the mine opened, the insulating plug should be removed to ascertain that a leather washer is in the recess, after which replace the plug, and screw it hard down with the screw collar, then test the plug, for non-contact, continuity, and insulation, as detailed later, and replace the loading hole cover. The india-rubber washers should be dusted over with blacklead or chalk to prevent from adhering to the iron.
Fitting Circuit Closer.- To charge and test a circuit closer-
Having previously tested the six-cell test battery, and two short leads, join the terminal at the base, and the short wire from the top of circuit closer by the two short leads to the terminals of the six-cell test battery:-
(a) Test the circuit closer for non-contact, working up from one to six cells.
(b) Unscrew the collar at the top of circuit closer, take out the spindle, and thoroughly polish the iron of spindle and inside of case; warm the circuit closer, and see that there is not dust or particles of tin or solder or traces of grease in it. Fill the lower part (as high as the shoulder) with re-distilled mercury, replace the paper washer, the spindle with the iron washer on top, then screw on the collar.
(c) Testing for Sensitiveness.- Then test the circuit closer for sensitiveness by steadily inclining it to an angle of 70º with the vertical, when it should make contact, and the needle to be deflected; if it does not, and makes contact too soon, there is too much mercury, or vice versa.
(d) Insulation.- Test the circuit closer for high insulation; keep it upright, and work up from one to six cells. If there is high insulation, there should not be the slightest swing of the needle. The circuit closer is now ready to be placed in the mine when required.
When the circuit closers are so adjusted, the motion to which they are subjected by the action of the waves and the tide, should not cause them to make contact, and yet the should be as sensitive as possible to a blow from a passing ship. The sensitiveness of the mercury circuit closer can be slightly altered by diminishing or increasing the quantity of mercury it contains.
In order to maintain mercurial circuit closers efficient, it has been found necessary to employ mercury with as few impurities as possible, and in order to obtain such, re-distilled mercury should always be used. If, however, this cannot be obtained, the ordinary mercury or quicksilver of commerce may be tested for impurities by being violently shaken in a glass bottle, when the impurities it may contain will usually appear on the surface.
In order to prove that a circuit closer is efficient, it should invariably be tested before sue with a six-cell test battery and 1,000 ohm galvanometer for insulation, and unless correct should be used.
Mercury that has once been used for amalgamating battery plates should on no account be employed, as it contains zinc.
The mercury is liable after a considerable time to become oxidised, and also to form an amalgam with any metallic dust or dirt there may be in the iron cylinder; this may from a metallic film across the ivory insulation, thus bridging over the circuit closer. If this occurs, the top must be unscrewed, and the mercury carefully cleaned by straining. Before re-filling, the circuit closer should be warmed to ensure its being perfectly dry, and care must be taken that there is no dust, or any particles of tin, solder, or any other metal in it, with which the mercury can form an amalgam. The best and simplest way of cleaning the mercury has been found to be as follows:-
Make a funnel out of a clean piece of blotting paper, and pierce a hole in the bottom with a pin. Place this funnel in the mouth of a previously well cleaned and dry circuit closer and pour the mercury in from the iron bottle containing it, letting it run slowly in. Prepare a second funnel and circuit closer and when sufficient mercury has been poured into the first, transfer it to the second in the same manner. It should never be poured into anything but a clean iron, china, or glass vessel.
The operation of charging the circuit closer with mercury should be carried out in a very dry place. If these precautions are attended to, the circuit closers will remain efficient for a considerable time.
The circuit closers should be kept charged with mercury, ready for instant use.
Before using, it should be balanced, and its continuity resistance ascertained. If this is found to be greater than 1 ohm it should be rejected, and opened, cleaned, and recharged at the earliest opportunity.
The balancing may be done with a firing resistance coil.
Circuit Closers should be kept Upright.- The charged circuit closers should always be kept upright at insulation, and should be ready to go in the mines at the shortest notice. For convenience of testing they may remain out of the mines till required.
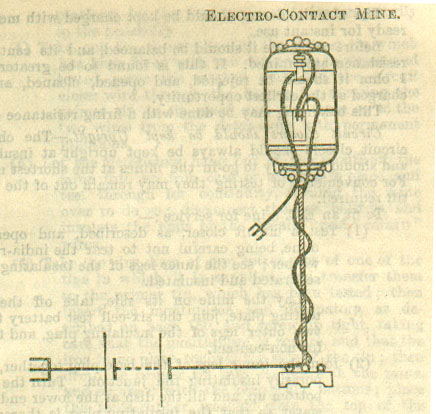
To fit an E. C. mine for service:-
(1) Test a circuit closer, as described, and open the mine, being careful not to tear the india-rubber washer; see the inner legs of the insulating plug separated and insulated.
(2) Join the inner legs of the base plug together, temporarily insulating the junction. Turn the mine bottom up, and fill the dish at the lower end with water, so that the insulating plug is thoroughly covered, and test first for continuity, and then for high insulation in the usual manner. Disconnect the battery, and insulate the outer legs of insulating plug.
Should the insulating plug not test efficiently, empty out the water and lay the mine on its side. Disconnect the inside ends of the insulating plug wires, and fasten to each a piece of twine about 6 feet long. Unscrew the screw collar and take out the insulating plug, using the pieces of twine as reeving lines. Replace the washer if necessary, by a new one, unfasten the pieces of twine from the old insulating plug, secure them to a new tested one, and haul the new wires taut into the mine, then screw up the screw collar as before.
(3) Empty out the water, stand the mine on its bottom, take the circuit closer which has been previously tested, join the "return" wire to the terminal at base of circuit closer, and fix it to the upper platform by the four screw nuts (or temporarily to the pedestal).
(4) Take out the mouthpiece of the primer tin which has been fitted with two detonators in series, and tested, reeve the marked wire and the circuit closer wire through the keeper for securing the primer tin in its place, and join them on to the two wires from the detonators with permanent junctions.
(5) Let the detonators hang out of the mouth of the mine into an iron case or other safe place, and test through for continuity, turning the mine over to do so; disconnect the test battery, and insulate the ends of the "main" and "return" wires.
(6) Take the dry discs of gun-cotton out of one of the tins in which it is supplied, and transfer them to the primer tin, which has been tested; then insert the mouthpiece and detonators, and screw tight, taking care that the mouthpiece is square, and that the iron in no place touches the side of the tin; then drop the primer tin into its place in the mine, and secure it with the keeper and buttons; place the india-rubber washer, close the top of the mine, taking care that the cover is placed on the proper way, with the ring outside. The circuit closer must be removed in a mine fitted with a pedestal to get the primer tin into its place; afterwards it may be permanently secured, taking care that the wires do not become disconnected.
Preparing the Circuit.- After fitting the circuit, or after use, and before stowing it away, it is to be tested for non-contact, continuity, and insulation, and the disconnectors fitted and joined up in their places and tested overboard.
A multiple disconnector box is now supplied which takes the three fuzes. The insulating plug and gland nut are done away with, and the box is closed and made watertight by means of a mouthpiece similar to those used to close up primer tins, but having four holes cut instead of two.
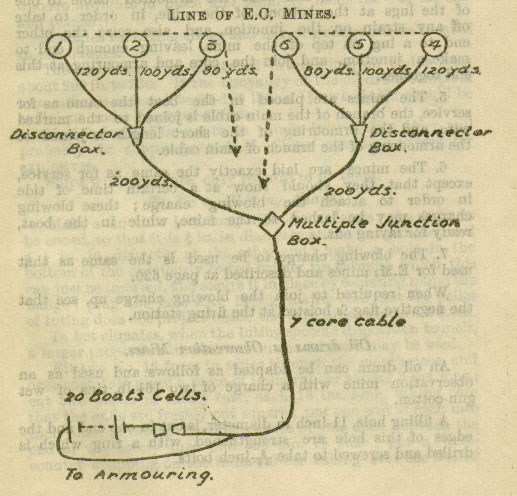
To fit the Disconnectors.- To fit the disconnectors in this case, proceed as follows:-
(1) Remove the mouthpiece from the disconnector box, and see the inside perfectly clean and dry.
(2) Reeve the ends of the cores of the 80, 100, and 120 yard lengths, and the 200 yard length through the holes in the mouthpiece from out in.
(3) Test three No. 19 fuzes, and join one leg of each to the 80, 100 and 120 yard lengths. The other leg of each join to the 200 yard length, making a four-way junction. Permanent junctions to be made, great care being taken in the insulation of the four-way one.
(4) Place a piece of tubing about 2 inches long over each of the three No. 19 fuzes to prevent the flash from one igniting the composition in the others.
(5) Place the fuzes in the disconnector box and place the mouthpiece. Screw up the nuts evenly all round, taking care to see that the iron in no place touches the side of the box.
If convenient, the box should then be lowered to a depth of 12 fathoms for 24 hours, and then raised and tested for continuity and high insulation.
Great care is to be taken to see that the inside of the case is perfectly dry before screwing up, as otherwise the fuze may deteriorate from damp.
A line of electro-contact mines is frequently disabled through a faulty disconnector, and therefore the greatest care should be bestowed on their fitting.
When no No. 19 fuzes are available, the upper joint of a No. 10 gun tube may be used instead, and is prepared as follows:-
Take off the upper joint of the tube and remove the gun-cotton wad. Cut out a small piece of paper and carefully tamp it into the end of the tube, drop in a little melted beeswax, and cover the end with a paper cap, securing it on with thread.
Dip the tube into shellac varnish, and hang it up to dry; the cut the wires about 1 ½ finches above the seizing, and clean the ends.
Rigging boat.- Test the fuze for continuity, balancing it if practicable.
A pinnace (either pulling or steam) is the most suitable for laying these mines, and is prepared be securing two counter-mine thwarts across the boat, the sinkers and mines hoisted out and placed on each side of the foremost, and port side of the after thwart, and the mooring and tripping ropes secured to them in the usual way.
The mooring wire of the mines should be marked in fathoms, so that it can be quickly adjusted.
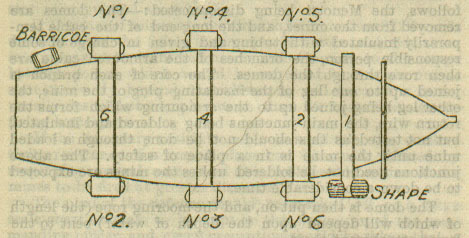
Coiling the Cable.- The whole of the cable is passed through the water into the boat, and tested on its way; the single part and junction box are passed into a gig, and the three branch wires from the junction box stopped to the stern; sufficient drift should be allowed for towing, and all three branches stopped with separate yarns to the starboard quarter of the mine boat; a slip rope is put round the branch wires from the bow of the gig. The 80, 100 and 120 yard lengths are to be passed into the boat singly for testing; Nos. 1 and 2 (or 1 and 5) branches are dipped under the boat and a coil made before No. 1 and 2 (or 4 and 5) mines, the end being on top; No. 3 (or 6) mine, the mine end being underneath. Then insulate the end of the 200-yard length.
The branches are then secured in the clips and seized to the eyebolt on the side of the mine.
Joining up.- The core of each branch is then joined to the main wire, the armouring to the return wire, and the protecting plate secured; great care should be taken in insulating the junction of main wire and branch of main cable, as the mine, being loaded, cannot be tested. Stop the cable down to the sinker, taking care to leave sufficient slack, so that the mooring rope will take all the strain from the mine; stop the tripping rope back along the branch cable and coil it up clear for running outside the boat.
Mark buoys will be placed 120 feet apart, to indicate the position where each mine is to be dropped.
Laying Out.- The mark buoys being prepared will be hung round the sides of a boat towed by a steam boat, or else round the steam boat herself. The boat carrying the buoys will also be provided with a grass line marked with bunting at intervals of 120 feet; and also a lead line. One end of the grass line will be made fast to the first buoy to be let go.
The boats will then proceed to the mine field, and drop the buoys at the places marked out on the chart for the E. C. mines, but about 20 feet on one side, so that the boat carrying the mines may be able to run exactly on the marks without going foul of the buoys. Soundings are then to be taken abreast each buoy, on the leading marks, and the height of tide noted. Shortly before running the mines, the mooring ropes of all buoys are to be tautened up, so that the buoys may be exactly in their right place.
The boat with the mines proceeds to No. 1 (or 4) buoy, and when abreast the after mine, the port side is dropped; on arriving at No. 2 (or 5) buoy the foremost mine on the port side is dropped and the gig let go. At the same time the slip rope is cast off and the gig pulls towards the junction boat, taking care to keep the branches clear. The branch to the third or sixth mine is paid out and the mine let go when opposite No. 3 (or 6) buoy; the steamboat then tows the gig towards the junction boat, and when the branches are fairly taut and the gig clear of the mines, the junction box (which should have a small buoy and buoy rope attached) is let go and the cable paid out, taking the end to the junction boat. The other group should then be laid out and the 200-yard lengths joined to one of the cores of the multiple cable, each group being tested separately with the single-cell test battery before joining up.
If these cables are not long enough to reach the junction boat, the ends from the mines should be joined to a piece of single-core cable of suitable length, using an ordinary connecting box. The mark buoys are then removed.
Two groups may be taken away in the launch at the same time. In this case the mines would be placed in the boat as follows:- No. 1 would be the after mine port side, No. 2 next to No. 1, and No. 3 the after mine starboard side. No. 4 would be starboard side next to No. 3, and No. 5 the foremost one the same side, No. 6 being the foremost mine port side. The cable would be coiled in the launch is a similar manner as for one group, each group having a separate gig to take the disconnector box and the 200-yard length.
The following preparations in the mine field are also necessary:-
Preparations in the Mine Field.- Leading marks are set up and a mark buoy dropped in the position to be occupied by the furthest mine, the same as for observation mines.
Soundings.
Great accuracy must be observed in taking the soundings, so that the mines may be arranged, if possible, not to show at any time of tide, and yet not be too deep to be struck by a passing ship of very light draught.
If the rise and fall of the tide is too much to admit of this, the respective lines of electro-contact mines must be arranged so that the outer line is the deepest.
These soundings must be all reduced to low water spring tides. A tide gauge should, therefore, be established on shore, and a numeral flag kept flying during the operation to indicate constantly the depth of water above low-water spring tides, in order that the officer conduct in the soundings can reduce them accordingly.
Experience has shown that the difficulty of mooring mines at a specified depth is considerable, and that much practice is needed before accuracy obtained.
Testing the Mines.- After the mines are laid and joined up to the multiple cable, the line should be carefully balanced from the firing station, and if any mines are showing, they may, if fitted for exercise, be bumped with a boat at the discretion of the officer in charge of the defence; but before this is done the officer should see the end of the cable disconnected from the firing battery, and the core and armouring joined to the single cell test battery, and the negative flag hoisted at the firing station.
On bumping, if the mines are in good condition, a full swing of the needle should be obtained.
1. Fitting an Electro-Contact Mine for Exercise.- The circuit closer and insulating plug are tested the same way as in fitting the mine for service.
2. Join the return wire to the terminal at the base of the circuit closer, and fix it in place; join the "main and circuit closer" wires together through the mouthpiece of a primer tin and insulate the junction.
3. It is then to be examined by the officer in charge, who is to satisfy himself that no detonators have been joined up, see the mouth of the mine closed, and then mark it "Fitted for Exercise."
4. Test a short length of armoured cable (about 5 feet long), for continuity and high insulation, join one end to the return wire, and seize the armoured cable to one of the lugs at the bottom of the mine, in order to take off any strain on the junction, and also seize the other end to a lug on top of the mine, leaving enough end to make a junction, and join the core and armouring at this end together.
5. The mines are placed in the boat the same as for service, the branch of the main cable is joined to the marked wire, and the armouring of the short length is joined to the armouring of the branch of main cable.
6. The mines are laid exactly the same as for service, except that they should show a certain time of tide in order to attach the blowing charge; these blowing charges may be lashed to the mine, while in the boat, ready for laying out.
7. The blowing charge to be used is the same as that used for the E.M. mines.
When required to join the blowing charge up, see that the negative flag is hoisted at the firing station.
An oil drum can be adapted as follows and used as an observation mine with a charge of two 16 ¼ tins of wet gun-cotton.
A filling hole, 11-inch in diameter, is cut in one end and the edges of this hole are strengthened with a ring which is drilled and screwed to take 5/16 inch bolts.
A cover is made for this hole and to the centre of the cover secured a primer tin, being in the manner shown in sketch.

In this way 2 leads of Pattern 600 can be taken out and connected to the Pattern 841 which is led up to the top of the drum and secured by stout clamps to the flanges of the oil drum.
The 16 ¼ lb tins are placed one on top of the other and secured in place by wooden uprights and small wood wedges. A wooden cross piece on the top of the upper tin holds the wooden uprights in place and securely holds the 16 ¼ lb tins and primer.
Shackles for lifting slings and mooring slings can be secured to the flanges.
The buoyancy of an empty oil drum slung on end is from about 200 lb to 230. If the buoyancy of the oil drum complete as a mine, is reduced to 80-100 lbs, a 1 ¾ cwt sinker should be sufficient under most conditions.
If it is decided to use these mines in quantity they will probably be supplied to H. M. Ships complete, except for explosives.
Ships will, therefore, only be required to fit them.
Make a tin tube ½ in long with 3/16 in flange; the tube to be coned, so that it is 3/8 in in diameter at the flanged end, and a ¼ in in diameter at the other end; make a hole in the bottom of the previously tested primer tin through which this can just be inserted, and secure it in place by soldering round the flange; plug the hole with luting, taking care that the pellet of luting does not project inside the tube so as to form a button.
In hot climates, when the luting shows a disposition to melt, a larger proportion of beeswax in the mixture may be used.
Fit two No. 19 fuzes in series through the mouthpiece, and over each fuze place a piece of india-rubber tubing 3 ins long; cut two pieces of safety fuze, each 18 ins long, taking care that the ends are freshly cut square; put one end of each into each piece of tubing, leaving a space of one inch between the end of the safety fuze and the No. 19 fuze; put a west-country whipping on the india-rubber tubing over the No. 19 and the safety fuze, but take care not to confine the one inch space between them. The fuzes so prepared are to be treated in all respects as if they were detonators, and when the mine is fitted the mouthpiece is to be placed in the empty tin fitted as above, instead of into the guncotton.
Return to WWI The Maritime War
Return to WWI Archive main page.
![]()