Previous Section
Return to initial page of
Cruisers and Destroyers
1. Purpose of Synthesis.
For purposes of possible clarification, or of more comprehensive illustration, the various elements discussed in connection with the employment of cruisers and destroyers in the general action are herewith assembled in possible tactical situations. This summarized treatment will, it is felt, tend to give a better appreciation, in action to be taken by commanders of these types, of the importance to time and relative position.
The general illustration that follows is based on two assumed situations embodying:
The Battle, where BLUE is superior in Cruisers and Destroyers;
The Battle, where BLUE is inferior in Cruisers and Destroyers.
In perusal of these situations, it must be realized that any tactical situation, including the ones illustrated, merits its own solution.
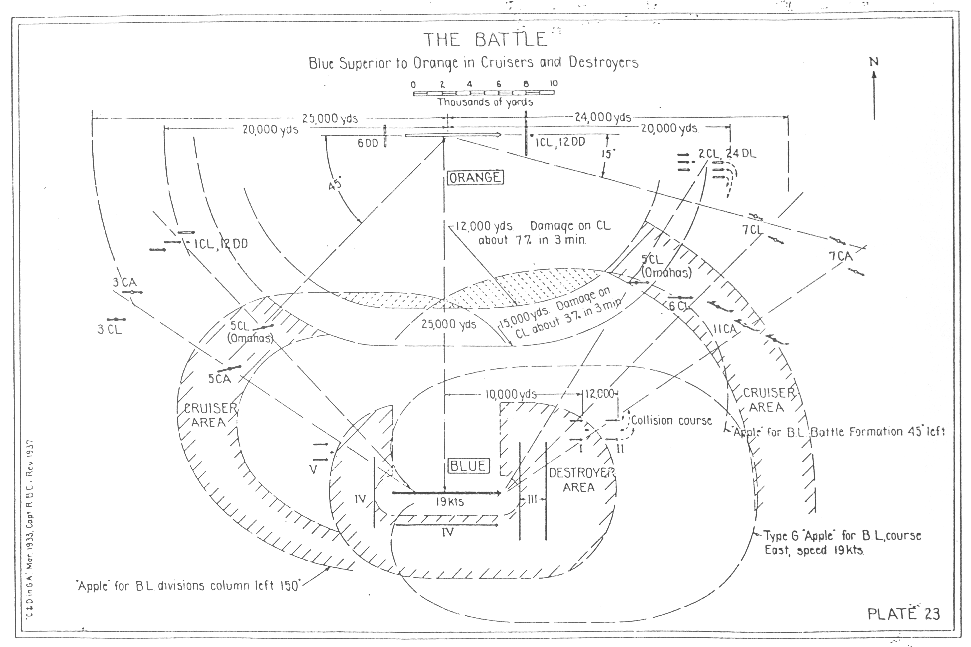
2. The Battle, where BLUE is Superior in Cruisers and Destroyers.
Plate 23 shows the trend of an engagement shortly after deployment, with the battle line range at 25,000 yards. BLUE has been seeking action, and has a superior battle line, upon which he primarily depends. His cruisers are superior in gun fighting strength to the enemy's cruisers and destroyers combined and have been assigned a defensive task initially in order to insure freedom of maneuver for own battle line.
BLUE destroyers have been stationed during the approach near the center of maneuver of the fleet. When the deployment signals are made out, the destroyers move, as illustrated on Plate 18. In Plate 23 the destroyer squadron (V), which is in excess of the anti-submarine screen, goes to the rear. Squadrons I & II move out toward the enemy, and, when ordered, stand in on collision course to attack. They will pass about 5000 yards astern of the 5 Omahas, if the Omahas maintain present course and speed. All destroyers stay generally within or near the hatched area, marked "Destroyer Area", until ordered to attack. Those not assembled for attack form as anti-submarine and anti-aircraft screen.
As soon as the enemy light forces are sighted during the approach and without waiting for fleet deployment or any other orders, the BLUE cruisers match off equal force to equal force and interpose on "apples" for the longest-range torpedo that the enemy light forces carry. They steer a course at the speed required to hold this interposition on or near the "apples". As the enemy light force strength and disposition is made out, reinforcements move or are sent in where required until superior force is interposed against all enemy light forces -- the CAs against CAs and the CLs against destroyers, if practicable. If the enemy light forces come in to fight, BLUE engages; but he does not pursue much beyond the "apples", unless the BLUE battle line is not uncovered thereby and a decided advantage is to be gained. By this means the BLUE cruisers insure so far as is possible, theoretical freedom of maneuver for their own battle line.
As soon as the deployment is ordered, the BLUE cruisers draw in the "apples" shown on Plate 23 -- one for the deployment course, one for battle formation 45º to the left of the present course, and one for a change of course by the battle line to division columns left 150º; all for battle line speed of 19 knots, the maximum formation speed. These "apples" are tentatively assumed to cover all probable maneuvers of the battle line. They do not differ much from those used in the approach, except the one in the original van in the approach comes in closer to the battle line by about 5000 yards. The BLUE cruisers and attack destroyers hold their positions on or near the "apples" so drawn. If the enemy desires to push in a destroyer attack he will have to contend with BLUE cruiser opposition. The enemy may not be able to find an open space for an attack, as the BLUE cruisers are on interior lines and are or can be interposed.
There is one general area where BLUE cruisers may have difficulty in interposing -- the area covered by the enemy battle line secondary battery. This battery can inflict, according to the War College scoring system, about 3% damage on the BLUE Omahas at 15,000 yards and about 7% at 12,000 yards in 3 minutes. The area in question, shown Plate 23, becomes even a greater obstacle to the maneuvering water of the BLUE cruisers as the battle line range decreases. BLUE cruisers may hesitate to enter it, but may have to do so to stop a destroyer attack. How effective the secondary battery of the enemy battle line will be, while enemy ships are under main battery fire at effective ranges from the BLUE battle line, is problematical. The best area, theoretically, however, for the enemy destroyer attack will be through this area, as was discussed in Section IV.
The enemy in Plate 23 has taken a type battle disposition, although his rear flank forces have been unable to reach assigned stations on account of BLUE opposition.
It is believed, in the tactical situation depicted, that as long as BLUE cruisers remain interposed in superior strength in the hatched areas, marked "Cruiser Area", BLUE battle line will have practical liberty of decision and action, as the enemy has to overcome superior cruiser strength in order to deprive BLUE of this important factor.
3. The Battle, where BLUE is Inferior in Cruisers and Destroyers.
In this case, it is assumed that BLUE has the superior battle line, but is inferior in cruisers and destroyers. He is seeking decisive action, and is relying primarily on his battle line, with his light forces on the defensive to insure freedom of maneuver so far as possible. The enemy will probably use his superior light forces on the offensive to endeaver to make up his inferiority in the battle line.
BLUE cannot be strong everywhere as in Plate 23. If he attempts to match the enemy's light forces in every direction, he will probably be weaker in every direction, and thereby tend to lose all chance of freedom of maneuver.
Assumption is made, for purposes of discussion, that BLUE will endeavor to overcome this by deliberately being weak on one flank in order to be overwhelmingly superior on the other. By this means he will surrender freedom of maneuver in one direction in order to gain it in the other. Accordingly, BLUE will select a battle line course that will place the greater part of the enemy's light forces abaft the beam of his battle line, so as to minimize their torpedo effectiveness, and will concentrate the greater part of his own light forces on the other flank to keep his van clear. Further assumption is made that his will result in a "chase-tails" action.
Plate 24 illustrates operations of the cruisers and destroyers under these conditions, in conformity with the study preceded in this paper. BLUE battle line is shown in battle formation with divisions in column 15º to the right of the deployment course. The battle lines are just on the edge of visibility. BLUE Desrons I & II, consisting of 18 destroyers, have just been wiped out by the RED light forces A and B. There is a smoke pall in this locality from the melée and burning ships.
It is difficult for BLUE O. T. C. to make out what is happening in this area. When last seen, the RED light forces at B were heading at high speed for the melée, the result of which is as yet unknown. RED light forces at C also are heading for the melée at high speed. The RED destroyers at C are believed to be fresh, as well as RED's anti-submarine screen at E. The RED cruisers at D have been under battle line and light force fire for some time. They are reported as being crippled. The BLUE light forces at X, Y & Z are in good condition. RED destroyers, ship for ship, are superior to BLUE's.
"Apples" for BLUE battle line courses 105º, 135º, 225º and 270º are shown. If BLUE turns his battle line to SW, the smoke will be well within the "apple". RED light forces are there now and RED forces at B soon will be. If BLUE battle line continues to eastward (course 105º), RED light forces are outside of the "apple"; D and E well outside, C 3000 to 7000 yards outside. The most threatening area for BLUE, therefore, appears to be in the direction of A. It is assumed that BLUE decides to put the area A abaft his beam and use his light forces to clear away his van. There is yet time to stop the RED light forces at D, C & E with the equal or superior BLUE light forces at X, Y, & Z. Until the threat from them is removed, the BLUE battle line may not be able to turn more to the southward, as the chase-tails action will require. But BLUE O. T. C. hopes that Desrons I & II, which are fighting in the smoke at A, may have gotten off some torpedoes at the RED battle line, which would possible force RED battle line to turn away out of sight and give BLUE a breathing spell to return to his present van.
To accomplish this, BLUE O. T. C. decides to direct all his light forces, including his anti-submarine screen, to protect his van on a SE course. To do this, BLUE cruisers at N strive to interpose between the battle line and the RED cruisers D on the "apple" for course 135º; BLUE destroyers at Y move for the same purpose toward the enemy C, and BLUE destroyers at Z in the same manner for E, or for B, if B turns in. They go out as far toward the "apple" as they can, in order to bring effective gunfire to bear on their opposites, at the same time avoiding effective gunfire from the secondary battery of the RED battle line. BLUE battle line, in the meantime, turns to the SE as far as the clearing operations will permit. By this means BLUE neglects his right flank and concentrates his effort on his left flank. His battle line secondary battery is available, in its most effective arc, for use against the enemy at A, and on B, if B stands further to the westward.
In this decision by the BLUE O. T. C., a major consideration regarding consequences is evident for both the battle line and te interposing and "clearing" BLUE light forces. If RED battle line, or RED forces at B, C and D, are lost to visibility from BLUE battle line, the BLUE light forces proceeding from X, Y and Z may be placed under direct fire of the many battery of RED battle line.
Return to initial page of Cruisers and Destroyers
Return to WWI The Maritime War
Return to WWI Archive main page.
![]()